Pages

.

My 1st Daring Bakers Challenge

Daring Bakers Challenge: French Yule Log

First Daring Bakers Challenge, and a challenging one! This month's challenge was brought to us by the adventurous Hilda from "Saffron and Blueberry" and Marion from "Il en faut pour etre heureux". They have chosen a French Yule Log by Flore from "Florilege Gourmand". I hadn't figure out until I was about to post this entry and by looking for the links, that the recipe comes from one of my absolute favorite pastry sites!! I have always admired Flore's work and her ability to explain the recipes in a simple and clear way. I tried many of her recipes and they are all perfect. She is good at what she does, and doing this challenge is more than an appreciation to all her efforts.

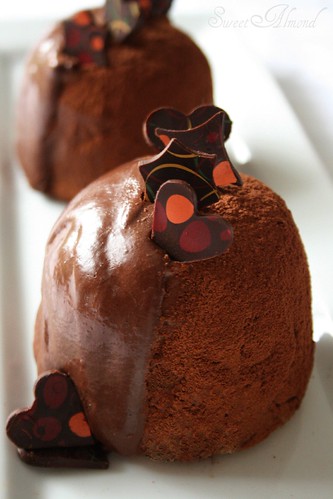
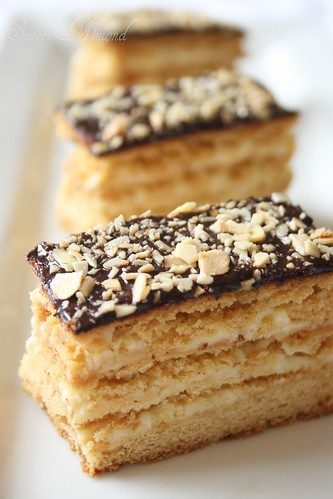
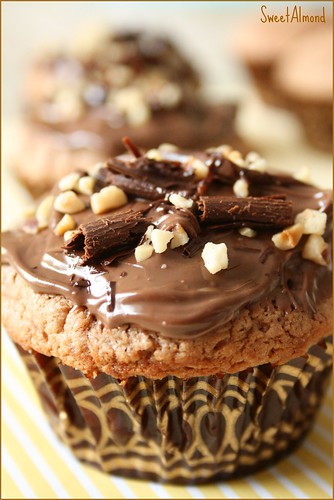
This Yule Log is an entremets like dessert. I must say that entremets are my favorite kind of desserts. I love them because of their different layers and textures. This particular one has 6 different tasty layers: a chocolate mousse, a creme brulee insert, a praline crisp, a chocolate caramel ganache, a dacquoise and a chocolate glaze. I thought the final result would be very chocolatey, but it came out balanced and not too sweet. The creme brulee insert took this dessert to a whole new level (may be because I'm a creme brulee addict!). I never thought I could use a creme brulee inside a cake!


Daring Bakers Challenge: French Yule Log

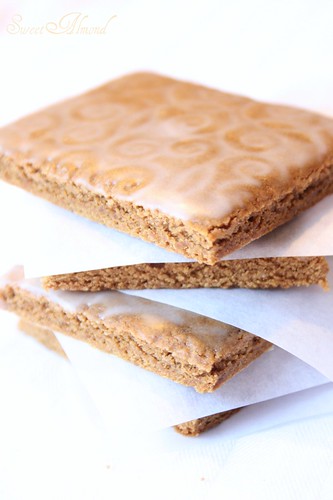
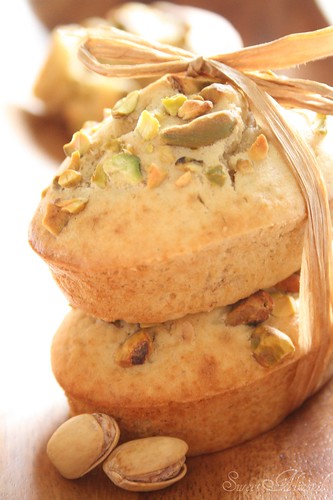
I pretty much followed the recipe and made very little changes (used a hazelnut dacquoise instead of an almond one). Everything in the recipe worked fine. The only thing that I wasn't happy about was the final glaze. It was OK until I added the gelatin or agar agar actually. As soon as the gelatin was added the mixture became grainy and lost its shine. I had to add boiling water to fix it but still the glaze didn't come out smooth and shiny, and since I added water the color became lighter, more like a milk chocolate glaze.
As you may have noticed also, I didn't exactly make a "yule log" but rather individual domes. I did this for 2 reasons:

1- I bought online a round yule log mold, was extremely excited about it and couldn't wait to get it. I've always wanted to own one and this challenge was a reason enough for me to order this pan.I waited patiently for days and days. Then after about 2 weeks, I thought something might be wrong with this order. I called the dealers and guess what: they said the product is out of stock and will be available on.............January 4th!! Wait wait wait, you cannot do this to me, I haven't even been notified about that!! I need this for my daring bakers challenge, why is this happening??!! I wished the whole thing was a nightmare but unfortunately it wasn't, I had to deal with the reality : I had to come up with another idea. I thought about using the loaf pan but wasn't excited about the shape. So, I ended up using small trifle pans. The shape didn't come out perfect, but I had no better choice.
2- The other reason was dealing with the size of the log. Using these small individual pans was better actually because they are perfect for two (I consider my self a "half human" actually because I eat so little!!). I was wondering before making the recipe who will eat this huge dessert?? I was pretty sure I would take 2 or 3 bites and stop right there, so my husband will end up eating the whole thing!! no, not good! After all, the unfortunate "pan" story wasn't that depressing.

Overall, this first experience was fun and a tasty one and although the recipe seems complicated, it truly isn't. Now,
I can't wait for the next challenge!


reade more... Résuméabuiyad

Bua Loy Khai Waan


Rice Balls with Poached Eggs in Coconut Milk or know as a "Bua Loy Khai Waan" in Thai.   This is a little modern from tradition by add corn and young coconut and make colorful rice balls.

INGREDIENTS:
  • 1 cup glutinous rice flour
  • 4 eggs
  • 1 cup sugar
  • 1 cup coconut cream, heat until hot
  • 2 3/4 cups water
PREPARATION:
  • Knead the glutinous rice flour with water until a dough forms. 
  • Shape into small balls about I cm in diameter. 
  • Continue shaping until finished.
  • Bring the 2 1/2 cups of water to the boil over medium heat, drop the balls in boiling water; and boil until done (they will float to the surface). 
  • Remove with a slotted spoon, and place in cold water until slightly cool, remove and drain.
  • Combine sugar and the remaining water, and bring to the boil. 
  • When all the sugar has dissolved, strain and bring back to the boil. 
  • Break the eggs, one at a time, and carefully drop into the hot syrup. 
  • Boil for a while, then turn the eggs over and continue boiling for a little while. 
  • Spoon a poached egg into a bowl, add the rice balls and some syrup. 
  • Top with coconut cream.
  • Serve hot.
Tip: The rice balls with poached eggs in coconut milk will be more aromatic if the jasmine-flavored water is used instead of water.

  
reade more... Résuméabuiyad

Khanom Yok Manee (Pandanus Tapioca Pearls Pudding)


Pandanus Tapioca Pearls Pudding also know as "Kanom Yok Manee" in Thai. Like many Thai desserts, this pudding tastes salty-sweet and includes a coconut for texture. The green color comes from pandanus juice.

INGREDIENTS:
PREPARATION:
  • Wash the tapioca pearls, discarding all the dirt drain and set aside.
  • Toss the grated coconut and salt, steam until heated through, then set aside.
  • Bring the water to the boil and pour over the tapioca pearls.
  • Add sugar and tapioca flour stirring to combine.
  • Follow with the pandanus juice, and stir again.
  • Fill each foil cup with the sweet pearls;
  • Arrange on the steamer and steam over boiling water on high heat for 10 minutes, or until done.
  • Sprinkle the salted coconut over the top as garnish.
Tip: Tapioca flour can be substituted by corn flour.

  
reade more... Résuméabuiyad

Khanom Bua Loy Thua Khiao (Mung Bean Balls in Coconut Cream)


Mung Bean Balls in Coconut Cream or “Khanom Bua Loy Thua Khiao” Thais called. Some time we mix with Taro. And most of the time we add one egg in a bowl before serve. Some people don't like no need to add egg. This dessert very famous for winter season in Thailand.

INGREDIENTS:
  • 1/3 cup hulled mung beans
  • 2 cups coconut milk
  • 1/2 cup palm sugar
  • 1/2 cup glutinous rice flour
  • 1/4 cup water
  • 1/4 tsp salt

PREPARATION:
  • Soak the mung beans in water for 1 1/2 hours;
  • Remove them from the water. Steam them until tender; then, mash them to a fine paste.
  • Set aside 1 cup of the coconut milk.
  • Mix the remainder with the palm sugar and salt in a pot. bring to a boil, stirring regularly to prevent lumps from forming, and then remove from the heat.
  • Mix the mashed mung beans with the glutinous rice flour Adding a little water (no more than 1/4 cup) a little at a time and kneading to obtain a soft dough.
  • Roll the dough into balls about 1/4 inch in diameter cook the balls by placing in boiling water; when the balls float to surface, remove them from the water and put them into the pot of boiled coconut milk.
  • Place the pot on the heat once again, add the cup of coconut milk set aside earlier, and remove from the heat, and dip into small bowls to serve.
reade more... Résuméabuiyad

Thua Dam Kaeng Buad (Black Bean in Coconut Cream)


Thai famous Black Beans in Coconut Cream or "Thua Dam Kaeng Buad" for local Thais. Most or the time we serve with sweet sticky rice topped by black beans in coconut cream.

INGREDIENTS:
  • 1 cup black beans
  • 2.5 cups coconut milk
  • 1 cup palm sugar
  • 1/4 tsp salt
REPARATION:
  • Soak the beans for 3 hours (or leave them soaking overnight).
  • Boil them in the water in which they were soaked, and when they are tender, remove from the heat and drain off the water.
  • Mix the coconut milk with the salt and sugar until the salt and sugar has dissolved.
  • Then, bring to a boil, filter through cheesecloth, and then return to the heat.
  • Add the beans, and when the coconut cream has returned to a good boil, remove from the heat and the bananas are pale red, then remove from the heat Arrange on a plate.
  • Serve warm.
Tip : The slaked lime water will give the firm texture to the bananas, however it can be omitted in case of unavailability.

  
reade more... Résuméabuiyad

Kluay Nam-wa Chuam (Banana in Syrup)


Banana in Syrup this popular Thai dessert is called "Kluay chuam" However, this dessert is strictly for the sweet-toothed. The bananas are cooked in a syrup (sugar and water). Then topped with coconut cream.

INGREDIENTS:
  • 1 hand nearly ripe bananas (approx. 12 bananas)
  • 2 cups clear slaked lime water
  • 3 cups sugar
  • 2 cup water
COOKING:
  • Peel the bananas, cut each in half crosswise.
  • Soak the bananas in slaked lime water for 30 minutes.
  • Rinse in plain water, drain and set aside.
  • Mix the sugar and water in a brass wok.
  • Heat until sugar dissolves, strain through cheesecloth and return to boil over medium-low heat.
  • When the syrup starts boiling, put in the bananas and cook over medium heat, stir occasionally until the syrup is thick and the bananas are pale red, then remove from the heat Arrange on a plate and serve.
Tip : The slaked lime water will give the firm texture to the bananas, however it can be omitted in case of unavailability.
reade more... Résuméabuiyad

Khanom mor Kaeng (Mung Bean Thai Custard)


Mung Bean Thai Custard or Thais called “Khanom mor Kaeng” When people from Bangkok go down to the beach resorts at Cha-am or Hua Hin, they will nearly always stop at these large roadside food shops selling Thai desserts. Phetchaburi is famous for this dessert and others too.

INGREDIENTS:
  • 4 eggs
  • 2 duck's eggs
  • 1/2 cup cooked taro or hulled mung beans, mashed finely
  • 1 cup coconut cream
  • 1/2 cup palm sugar
  • 1/2 cup crisp-fried shallot slices
  • 2 tbsp oil from the fried shallots
  • 3 pandanus leaves
COOKING:
  • Break all the eggs into a bowl, add sugar and coconut cream.
  • Mix thoroughly by kneading with the pandanus leaves until the sugar has dissolved.
  • Strain the mixture through cheesecloth, add mashed taro or mung beans, and mix well.
  • Pour into baking pan.
  • Bake in an oven at 350°F for 20 minutes or until the custard is done and the surface is golden brown.
  • Remove from the oven, and allow to cool.
  • Sprinkle with the crisp-fried shallot.
  • And cut into 2x2-inch pieces to serve.

reade more... Résuméabuiyad

Thap Thim Krob (Mock Pomegranate Seeds in Coconut Syrup)


Mock Pomegranate Seeds in Coconut Syrup Thai called "Thap Thim Krob" A popular dish found on many restaurant menus, thap thim krob (mock pomegranate seeds in coconut ice syrup) is made from water chestnuts coloured red, boiled and added to a sugar-water-coconut combination forming the syrup and served with crushed ice. This light and refreshing dessert is commonly served at the end of the meal.

INGREDIENTS:
  • 1 cup canned water chestnut, cut into small cubes
  • 1/2 cup tapioca flour
  • 150 g. sugar
  • 3/4 cup coconut milk
  • 3/4 cup water
  • Red food coloring,
  • crushed ice
COOKING:
  • Mix the food coloring with some water soak the water chestnut for 10 minutes, drain and coat with tapioca flour.
  • Shake off any excess flour.
  • Bring water to a boil, put in the floured water chestnut Boil until they float to the surface.
  • Remove with a slotted spoon and drop in cold water. Drain and wrap in a cheesecloth.
  • Combine the sugar and water in a pot, boil over medium heat until it becomes syrupy.
  • Add the coconut milk and stir to combine.
  • Remove from the heat.
  • Mix 3 tablespoons of ruby pearls with sufficient amount of coconut syrup and some crushed ice.
  • Serve...
Tip: Tapioca flour can be substituted by com flour.
reade more... Résuméabuiyad

Woon Ka-fae (Coffee Jelly)


A popular and simple Thai style jelly coconut with coffee and can be ... tastes and colours such as Pandanus leaf-scented, Fruit Jelly and Coffee Jelly. This recipe I call Coffee Jelly or "Wun Ka fae" in Thai.

INGREDIENTS:
  • 2 tbsp agar-agar powder
  • 1 tbsp instant coffee 1 cup sugar 
  • 3 cups water
  • 2 tbsp warm water
  • 1.5 cups coconut cream
  • 1.4 cup sugar
  • 1 tsp salt
COOKING:
  • Mix the instant coffee with warm water and set aside.
  • Mix agar-agar powder with water bring to the boil over medium heat Stir continuously until all the agar-agar dissolves, then add sugar. 
  • Continue boiling until the sugar has dissolved and the mixture boils well. 
  • Add mixed coffee, stir well, then remove from the heat. 
  • Pour the mixture into a pan, and place the pan in a bowl of warm water, set aside.
  • To make the coconut cream topping; mix water and agar-agar powder together, bring to the boil over medium heat. 
  • Boil until the agar-agar dissolves, then add coconut cream, sugar and salt together. 
  • Stir regularly to prevent the coconut cream separating. 
  • Boil until the mixture dissolve completely, remove from heat, and place the pan in a bowl of warm water as well.
  • Spoon 2 tablespoonful of the coffee mixture into each mold, leave to almost set. 
  • Then spoon the same amount of the coconut mixture over and leave to almost set. 
  • Continue with this process until each mold is full. Leave to completely cool before remove from the mold.
Tip: The coffee jelly will be more aromatic if the jasmine-flavored water is used instead of water.


reade more... Résuméabuiyad

Kluay buad chee (Banana in Coconut Milk)


This Thai banana dessert is is fully vegetarian and is a very common Thai dessert. This dessert made with bananas cooked in coconut milk and topped with coconut cream. The bananas are the kluay nam wa variety and the word kluay means banana. The Thai name of this banana dessert is “kluay buad chee”

INGREDIENTS:
  • 10 ripe bananas
  • 1/2 cup coconut cream
  • 3 cups coconut milk
  • 1 cup sugar
  • 1 tsp salt
COOKING:
  • Peel the bananas, cut each in half lengthwise, then cut across to get 4 pieces.
  • Pour the coconut milk into a pot and cook over medium heat until it boils
  • Add the bananas, and cook until soft then add sugar and salt.
  • After sugar has completely dissolved, pour in the coconut cream, then remove from the heat.
  • Serve the warm bananas in a dessert bowl.
reade more... Résuméabuiyad

Lemon Shortbread

Another great recipe from "Tartine", my new favorite cookbook. My prior post was about a recipe from this book also : Gingerbread cookies, and they were delicious. I feel very happy when I find a good cookbook, and excited about trying all of its recipes! People who worked on this book did a wonderful job and deserve a big: Thank you!
Lemon Shortbread

I don't know what are the origins of shortbread but I guess every country has its own version. In Algeria we have something similar called "Ghribia". Very tender, melt in your mouth cookies made into different shapes (pyramid shape happens to be the most popular) and decorated with an almond. Some versions have ground almonds or peanuts in the dough. The way these cookies are made is a little different from the "American" shortbread but both have almost the same taste and texture.

The original recipe didn't call for lemon zest nor vanilla, but I added some for extra flavor. Shortbread is so rich and the lemon zest adds a hint of freshness and lightens up these cookies.

Lemon Shortbread Cookies (Adapted from "Tartine")

1 cup + 2 tbsp unsalted butter, very soft.
1/3 cup granulated sugar
1 3/4 cups + 2 tbsp all purpose flour.
1/2 cup +2 tbsp cornstarch.
1/4 tsp salt (reduced from the original 1/2 tsp).
Zest of 1 lemon.
1/2 tsp vanilla extract.
1/4 cup superfine sugar for topping.

Preparation

1- preheat the oven to 325. Butter a 6-by-10 inch baking pan.

2- Place the butter, the 1/3 cup of sugar and salt in a mixing bowl and mix well with a wooden spoon. Add the lemon zest and vanilla extract and mix until well incorporated.

3- Sift the flour and cornstarch. Add to the butter mixture and mix until a smooth dough forms.

4- Pat the dough evenly into the baking dish and bake until the top in lightly browned, about 30 minutes. Let cool the shortbread until warm to the touch.

5- Sprinkle the shortbread with the remaining 1/4 cup of sugar and cut into rectangles. If the cookies have become cold they will not slice well, so try to cut them while still warm. chill thoroughly before removing from the baking dish.
reade more... Résuméabuiyad

Honey Cake

I still remember very well the first time I tasted this cake, more than fifteen years ago. My aunt H. brought the recipe and it was a big hit since then. The whole family, aunts, cousins......everybody loved it. They even served it in some family weddings. Although I made this cake endless times, and tasted others as well, aunt H. is still the one who makes it best. Her honey cake has a unique flavor and texture.

What is special about this cake -besides being incredibly good- is the way it's made. Unusual and Very easy method, no need for a mixer or any fancy schmancy material. All you need is a pan and a wooden spoon! Its baking time is relatively fast too. The only thing that is a bit "time consuming" is the making of the pastry cream. I usually make it the night before. I sometimes make this cake just because I have leftover pastry cream.

I personally like cakes that have different textures, and this one has it all: sweet tender biscuit layers with a smooth fluffy vanilla pastry cream in between. Topped with a layer of dark chocolate to balance the sweetness, plus some crunch from the crushed almonds. It is a cake worth a try and once you make it I am sure it will be one of your favorites.


Honey Cake

Honey Cake

150 g unsalted butter.
100 g granulated sugar.
1/4 cup honey.
1 large egg.
3 Tbsp whole milk.
1 tsp baking soda.
1 tsp vanilla extract.
400 g all purpose flour.
1/2 tsp baking powder.
1/4 tsp salt.

Vanilla Pastry Cream

2 cups whole milk.
1 large egg.
4 egg yolks.
70 g granulated sugar.
60 g corn starch.
1 tsp vanilla paste or extract.
70 g soft unsalted butter.

Final Touches

100 g dark chocolate, melted.
Crushed toasted almonds.

Preparation

1- Preheat the oven to 375 f. Butter a 16 1/2 by 11 1/2 baking sheet. Set aside.

2 -In a sauce pan combine the butter, sugar, honey, milk, egg and baking soda. Cook over medium low heat stirring constantly until all the butter is melted. Add the vanilla. Strain the mixture in a bowl and set aside.

3- Sift together the flour, baking powder and salt. Add the dry ingredients to the wet mixture in three batches. At first you can use the wooden spoon to mix, then you'll have to use your hands because the dough will become harder. The final dough should be smooth and not sticky. If the dough feels sticky after all the flour is added, add more flour a tablespoon at a time until you get the right consistency. But remember not to over work the dough or you will end up with a tough cake instead of a light flaky one.

3- Press the dough on the baking sheet. Using your hands, flatten it as evenly as you can all the way to the sides of the pan. Prick the dough and bake for about 15 minutes or until golden brown. Let the cake cool in the pan for 10 minutes then transfer to a cookie rack.

Pastry Cream Preparation

1- Heat the milk over medium heat.
2- In a sauce pan, combine the egg, egg yolks, sugar and corn starch. Whisk until smooth.
3- Gradually add the hot milk to the egg mixture. Cook the cream over medium low heat until it thickens, 3 to 5 minutes. As soon as it starts to bubble remove from the heat and add the vanilla.
4- Transfer the cream to a bowl and cover with plastic wrap. To avoid a thick layer from forming on top of the cream, the plastic wrap should touch the top of the cream. Let the cream cool completely. If not using the same day, the cream should be well kept in a container and refrigerated . It can keep for 4 to 5 days.
5- When the cream is completely cool, add the soft butter and mix until light and fluffy (I use my hand held mixer for that).

Cake Assembly

1- Cut the cake vertically into 3 equal parts, about 5 inches each.
2- Spread the cream between each layer. You'll have 3 layers of cake and 2 of cream.
3- Cover the cake with the melted chocolate and decorate with the crushed almonds.
4- Cut the cake into 2 by 1 inch rectangles or into squares.

It is preferable to let the cake sit for an hour or 2 before cutting. This cake actually tastes better the following day. It can keep for a day in a cool dry place and should be put after that in the fridge.
reade more... Résuméabuiyad

Khanom Fak Thong (Pumpkin Pudding)


This is Pumpkin Pudding Dessert or "Khanom Fak Thong" in Thai. Thai dessert. Pumpkin is high in beta-carotene, an antioxidant that improves cancer-protective properties. Also this vegetable is a great source of Vitamin A and potassium. For those with a sweet tooth, Thais have a wonderful dessert of pumpkin in coconut milk.


INGREDIENTS:
  • 3 cups pumpkin, grated finely
  • 1/2 cup coconut cream
  • 1 cup coconut milk
  • 1/4 cup tapioca flour
  • 1/2 cup rice flour
  • 1/2 tbsp arrowroot starch
  • 1/4 cup sugar
  • 1/8 tsp salt
LET’S GO:
  • Mix tapioca flour, rice flour and arrowroot starch together. Gradually add coconut cream, stir constantly until all the coconut cream is used up. It will take about 15 minutes.
  • Add sugar, pumpkin, salt and coconut milk, continue stirring until sugar and salt are all dissolved.
  • Pour the mixture into a baking pan, spread out evenly, steam over boiling water for 20-25 minutes or until done. Remove from the heat and allow to cool. Cut into 2"x2" pieces.
Tip: Tapioca flour can be substituted by corn flour.
reade more... Résuméabuiyad

Fak Thong Sang-Ka-Ya (Pumpkin Custard)


This custard is spectacular to look at, and wonderful to eat. Makes a great Halloween or Thanksgiving dessert recipe, and a nice alternative to pumpkin pie. Don't be put off by the long baking time - it's actually a really easy recipe to make! A small pumpkin (or pumpkin-like squash) is filled with an easy Thai custard (a healthier and lower calorie version than traditional custard). Serve warm with a splash of maple syrup or brandy and a cup of strong tea or coffee, and ENJOY!

INGRADIENTS:
  • 1 small pumpkin
  • 5 duck eggs
  • 1 cup coconut cream
  • 1/2 sugar
COOKING:
  • Beat the eggs wih coconut cream and sugar until the mixture is frothy.
  • Cut the top of the pumpkin in square shape to make cover , look like a bowl with a cover.
  • Pour in the coconut cream mixture. Cook in the steamer for about 30 minutes.
  • Leave to cool or keep in refrigerator to make the custard firm.
reade more... Résuméabuiyad

Fak Tong Gang Buad (Pumpkin in coconut milk)


Pumpkin in Coconut Milk or Thai called Fak Tong Gang Buad. In Thailand, pumpkins are available year round. This will make a nice warm dessert in the fall. Many Thai desserts involve cooking rice, sticky rice or flour in sugar and coconut milk. However, pumpkin in coconut milk belongs to a class of dessert called 'gang buad', which refers to cooking vegetables, legumes or fruits in coconut milk with sugar.

INGREDIENT:
  • 1 cup water
  • 1/2 teaspoon salt
  • 2 cups pumpkin
  • 1/3 cup palm sugar
  • 1/2 cup coconut milk
COOKING:
  • Skin the pumpkin, remove the seeds and julienne into pieces of 2" x ½" x ½".
  • Add water and coconut milk to a pot and heat over low heat. Add salt. I would recommend adding half of the sugar and tasting before adding more. If you find it to be too sweet, add more water. Stir to dissolve the sugar. Add the pumpkin. Let it boil and let the pumpkin cook. Serve hot, warm or room temperature.
  • The key to this dish is using thin coconut milk. The top layer of coconut milk or cream will curdle when boiled. If your coconut milk is creamy, dilute it with water.
Tips: I recommend using acorn squash, moschata squash or any other yellow meat squash or cooking pumpkin.

reade more... Résuméabuiyad

Gingerbread experience

I bought a new cookbook that I adore, called "Tartine". Wonderful is the least I can say about it. I tried four recipes already and they all turned out good. I rarely experience this with cookbooks. I had this same impression with Jacques Torres cookbook "Dessert Circus". I can't say more than the author name! just mentioning the name tells it all!!
So, the book had these wonderful looking soft gingerbread cookies. When I looked at the picture I couldn't resist but try them. I never tried gingerbread cookies before, I had absolutely no idea what they taste like, plus I have a small issue with the smell of ginger, a bit too strong for me. Yet, I needed to give this recipe a try, and boy did they taste incredible! soft, just the right amount of spices and that glaze on top, yum!
I did made small, tiny small changes in the recipe (so me). It called for ground cloves, which I didn't have on hand, so I used some ground allspice. The recipe also called for ground pepper and I didn't add that, I was somehow scared of the result. I never used black pepper in any of my desserts.
This cookie is definitely a keeper. I don't know why, but I always felt that anything involving ginger was somehow healthy! these cookies are definitely not, but very tasty and worth a try.


Soft Gingerbread Cookies

Soft Gingerbread Cookies (From cookbook "Tartine")
3 3/4 cups all purpose flour
1 Tbsp cocoa powder
4 tsp ground ginger
1/2 tsp ground allspice
2 tsp cinnamon
1/2 tsp baking soda
1/4 tsp table salt
1 cup (2 sticks) soft unsalted butter
3/4 granulated sugar
1 large egg
1/2 cup dark molasses
2 Tbsp light corn syrup.

Glaze
1 cup Powdered sugar
2 Tbsp water

Preparation

1- Stir together the flour, cocoa powder, ginger, allspice, cinnamon, baking soda and salt in a mixing bowl. Set aside.

2- Using a stand mixer fitted with the paddle attachment, beat the soft butter and the sugar until light and fluffy. Add the egg and beat until well combined. Add the molasses and corn syrup and ,ix until well incorporated.

3- Add the dry ingredient and beat on low speed until a dough forms. Wrap in plastic wrap and keep in the fridge overnight (surprise, surprise!!)

4- Preheat the oven to 350 f. Line a baking sheet with parchment paper and set aside.

5- Unwrap the dough and place on a floured surface. Roll it out to about 1/3 inch thickness. You can leave the dough as it is or use a patterned rolling pin (like I did) so you get the nice patterns on the cookie. Place the dough as it is on the baking sheet and cook until golden brown on the edges. Let cool while you make the glaze.

6- Mix the sugar and water until smooth.

7- Cut the cookies into rectangles or squares. Using a brush, apply a thin layer of glaze and let dry. These cookies will keep in an airtight container for up to two weeks.
reade more... Résuméabuiyad

Pistachio & Banana Mini Cakes

Banana & Pistachio Mini cakes


I know it takes me years to post a new recipe, and I apologize for all of you who are following my blog and may be wondering why am I such a lazy blogger??!! I am "lazy" when it comes to writing and posting. I essentially created this blog mainly because people were asking for recipes on my flickr page, and my answer would be: soon .............on my blog! I ,hopefully, will be more serious and post more often. This post didn't help get me back on track, I almost gave up. I had so much trouble getting it all together. I wrote it may be 5 or 6 times and kept losing the whole work after adding a link. I gave up the link- obviously- and ended up frustrated! writing always drives me nuts!! Grrrrrr.....
Speaking about nuts, I need to mention couple things regarding this recipe. First, I am not a big fan of banana bread. I only make it when I have ripe bananas sitting on my kitchen counter for days. The cake itself is good and I think banana bread lovers will like it. BUT, the issue is in the "nuts". I discovered lately that I'm no fan of nuts in cakes anymore. I don't like when they become soggy when mixed and cooked with any kind of batter. So, I left their addition optional and let you decide!

Pistachio & Banana Mini Cakes (or 1 large loaf/cake)

100g butter, melted and cooled

1/2 cup vegetable oil

1 cup granulated sugar

4 eggs

4 medium bananas (preferably ripe), pureed

2 1/2 cups all purpose flour

1 tsp baking soda

1 tsp baking powder

1/2 cup milk

2 Tbsp lemon juice

Pinch of salt

1/2 to 1 cup chopped pistachios mixed with a tablespoon of flour

Preparation

1- Preheat the oven to 350 f. Butter and flour a large loaf pan or ramekins (you need a lot of those if you're making the full recipe)

2- Beat the eggs and sugar until light and fluffy, about 5 minutes. Add the melted butter, oil and the pureed bananas. Mix until well combined.

3- Sift the flour, baking soda, baking powder and the salt. Mix the milk and lemon juice. Set aside.

4- Add the dry ingredients mix to the wet one alternating with the milk. Fold in the chopped nuts

5-Bake until a toothpick inserted inside the cake(s) comes out clean. For the large loaf pan it will take between 50 and 55 minutes. The smaller ones, approximately 20 minutes. Cool before enjoying!

reade more... Résuméabuiyad

Date & Walnut Cake

I have always been skeptical about a cake made with dates. Although I love to eat dates, I just couldn't imagine this fruit being one of the main ingredients in a cake. However, we do have many traditional cookies made with dates. I come from a country where dates are a very popular fruit. In fact, Algeria is known for a variety of dates that is so unique and delicious. It is called "Deglet Nour" or "Nour's dates" also known as "The queen of dates". It is very sweet and tender, but what makes it unique is the fact that it is so transparent that you can see the pit from outside. I, so far, didn't see any other type of dates that has this criteria. I've seen some "supposedly" deglet Nour sold in the US, but I am always disappointed. It doesn't taste like the real thing at all!


Date & Walnut Cake

After this short lesson about Algerian dates history, let's talk about this cake, shall we? Since I never made a date cake, I had to look for a recipe. At my surprise, there were tons of them. Sure, they had all some points in common, but as always, just by reading a recipe, I could figure out that something might be wrong: too much sugar, too little butter...etc so I ended up creating my own recipe! and It came out perfect just the way I expected: perfect sweetness, very moist and full of flavor. It's been a while I didn't make a cake and ate more than half of it! yes, it is that good!

Date & Walnut Cake

Date and Walnut Cake

1 cup chopped dates
1 cup boiling water
1 cup all purpose flour
1/3 cup whole wheat flour
1 egg
5 Tablespoons granulated sugar
1 stick unsalted butter, melted and cooled
1 tsp baking powder
1 tsp baking soda
1/8 tsp salt
1/2 tsp vanilla extract
1 tsp orange zest
1/3 to 1/2 cup chopped walnuts

1- Preheat the oven to 350 f. butter an 8 in cake pan and cover the bottom with parchment paper. Butter the parchment paper too. Set aside.


2- Sift together the flours, salt and baking powder. Remove 1/3 cup of this mixture and mix it with the walnuts. Set aside.


3- Put the chopped dates in the boiling water. Simmer for about 5 minutes over medium low heat. Turn off the heat and add the baking soda. Set aside to cool.


4- Beat the egg with sugar, vanilla and orange zest until light and fluffy. Add the date mixture and mix until well combined.


5- Add the flour, butter and walnuts to the egg mixture and fold gently until evenly combined. Bake until a tooth pick inserted in the middle of the cake comes out clean, about 30 to 35 minutes. Set aside to cool before enjoying!

reade more... Résuméabuiyad

Baking Dilemma

I think I must seek help because I can't resist this recuring temptation of throwing my head into one baking experience after another!!!! I am afraid I would wake up one morning and find my hands turned into whisks! or my hair into strings of vanilla beans!! actually that one would save me a lot of money! Hmmm, since the "vanilla bean" subject surfaced and since I have some that's been in my pantry for a while, I wonder what is the best way to enjoy and get the most flavor out of a vanilla bean? I am thinking may be a custard, or....oh one of my favorite indulgences : Crème Brûlée! don't be intimidated by the fancy name, it is one of the easiest yet chic desserts. It is basically a rich custard topped with a crunchy layer of caramelized sugar. An intoxicatingly delicious combination of smooth silky custard and a crunchy sweet topping. Well, I guess I just found another excuse to grab my whisk.

Vanilla Bean Crème brûlée (serves 6)

2 cups heavy cream
50 g granulated sugar
4 egg yolks
1/2 vanilla bean split and scraped
6 tablespoons granulated sugar

Preparation

1- Preheat your oven to 325 f.

2-Heat the cream and the vanilla over medium heat .

3- Beat the yolks and the sugar until pale in color. whisk in about 1/2 cup of the cream . Gradually add the remaining cream whisking vigorously. Strain the brûlée base through a fine mesh sieve. Pour the custard in the ramekins.

4- Cook the custard in a water bath: pour some boiling water into the pan and place your ramekins inside (pour enough water to come up half way on the sides of the ramekins). Place the pan in the oven on the middle rack and bake for 30 minutes. To test for doneness, jiggle the pan slightly to see if the custard is set. Remove and let cool at room temperature then place in the fridge for at least 2 hours.

5- Once the Crème brûlée has cooled, evenly spread 1 tablespoon of sugar over each ramekin and using a blowtorch, caramelize the sugar to form a candy coating.

Enjoy! with moderation it's pretty rich
reade more... Résuméabuiyad

Tartes Aux Fruits - Fruit Tarts

I've been baking for as long as I can remember. This passion started since I was a child. I remember my first experience in the kitchen, I made an apple sauce and was so excited! and my first cake experience was a DISASTER. I was 8 or 9 years old, made the cake batter who was a "normal, liquidish type of cake batter" (I bet the cake could have been a successful one !!!) but I thought to myself "how can a mess like this turn into a cake" So guess what I did?? I threw the batter in the bathroom and warned my younger brother who was watching my adventurous catastrophe "If you tell mom, your sister will turn into the evil sister"......euh that's a tactic I used to trick him with, poor kid!
So, you can imagine how passionate I've always been (and always will) about baking. What you cannot imagine is that I don't eat a lot of sweets, unbelievable but true! I love to create, decorate, temper, assemble, beat, fold, any term you can imagine in the pastry world, but when it comes to consuming, I am very picky and have limited and specific preferences and the first thing that comes on top of my list is fruit tarts. My list may include also: tiramisu, fraisier, clafoutis....well I should write down a list but let's just keep this for another post :)

Fruit Tarts

I make my fruit tarts with either a Pâte Brisée or a Pâte Sucrée (sweet dough) , it really depends on the filling and the type of fruit used. A fruit tart should have a balance in sweetness between its three major components : the crust, the cream and the kind of fruits used. I also lighten my pastry cream by adding some whipped cream which, not only gives it a more airy texture, but also enriches its flavor. Yes, everything is better with cream.................and butter!

Recipe for one 9-in tart or four individual 4-in tarts

Pâte Brisée (crust)

250 g all purpose flour
125 g cold unsalted butter
1 tablespoon granulated sugar
1/8 teaspoon salt
1/8 teaspoon vanilla extract
2 to 3 tablespoons cold water


To make the dough, use either a food processor, a mixer or a bowl and the best tools : your hands! Combine all the ingredients except the water. Work the mixture until crumbly. Add the water one tablespoon at a time until you form a dough. It is very important not to over work the dough otherwise your crust will shrink in the oven and you will not have that light, flaky kind of crust. wrap the dough and chill for at least 30 mn. This step can be prepared up to 2 days in advance. Just wrap the dough well and keep it in the fridge.

Pastry Cream

1 cup whole milk (don't use low fat versions please)
2 egg yolks
40 g granulated sugar
30 g corn starch
1 teaspoon vanilla extract
1/4 cup heavy whipping cream

Heat the milk in a pan over medium heat. Meanwhile, combine the egg yolks, sugar and corn starch and mix until well combined. Gradually, add the hot milk. Put the mixture back in the pan and cook, stirring continuously (not the time to answer the phone, yeah yeah I know baking requires a lot of sacrifice) until it thickens. Off heat, stir in the vanilla. Transfer to a bowl and cover with plastic wrap and let cool at room temperature then into the fridge for up to 2 days.
When ready to use, whip the cream and fold it into the COLD pastry cream.


Preparing the tart shells

Preheat the oven to 375. Remove the dough from the fridge and if it got too hard, let it sit for about 15 minutes. Flour your work surface and roll out the dough to about 1/4 in thickness. I like my crust pretty thin.
Arrange the dough on the mold (s) of your choice. Pick the entire surface of the dough with a fork and layer a piece of foil on top of it. Fill the foiled pan with beans. This will help the crust keep its nice shape.
Cook the crust for 10 minutes then remove the foil (and the beans!) and continue baking until lightly brown. Cool completely before filling.

Tart Assembly

Fill each tart with the cream and your choice of fruits. In this particular one, I used : strawberries, figs, pineapple and mango. Use any type of glaze to make the tarts look shiny: fruit glaze, apricot jam...etc. This is optional though.

Enjoy!
reade more... Résuméabuiyad

Gourmandises!

Macarons are these cute French almond cookies that come in different flavors and colors and make everyone goes:" WOW! I want one!". I remember when I made my first macarons here They look funny, don't they!?? the color looks odd and they are too fat! but over all I was quite happy with my result as a first attempt, ehm ehm!!!
The thing with macarons is that you either like them or hate them. but honestly who can resist those cute friandises??..........my hubby does, he always tells me "what!?? you made them .....again??? they are too sweet! " It is true that they are sweet, and I haven't come across a recipe that uses less suagr than this recipe, but the thing is macaons are so flavorful that you don't need to eat a ton! have them with coffee or tea, just find a reason to eat them!!

Chocolate Macarons

If you ask me what is the perfect macaron? I honestly don't know. I never had macarons other than mine, so - according to "me" - a macaron should Not be too flat nor too fat (like my first catastrophic attempt!). I personally prefer them on the flat side because usually they'll be filled and sandwiched so we don't want a cookie that is as high as the empire state building. Also, it has to be chewy on the inside, but again not undercooked,and should be slightly crunchy on the outside. Finally, the top of the cookies should come out shiny, not grainy or cracked.
Voila, I think that should be the "A B C's" of macarons. Oh! I almost forgot that one of the most important thing to remember when making macarons is the OVEN TEMPERATURE. They should cook in a low oven, no more than 325 f.
after so much talking, I know you can't wait to check the recipe. I used in mine half almonds and half hazelnuts but you can use only almonds and omit the coco if you want other flavors.I also used hazelnut praline in the filling which is basically a cooked caramel and nut that is cooled and ground to a powder. I have to mention that if you are expecting a very chocolaty macarons, you should look for another recipe! or stick with this one and add more coco!


Chocolate hazelnut Macarons


Macarons batter

100 g egg whites (some recipes require 1 day or 2 day old whites. whenever I have leftover whites I use them for that, otherwise I just use fresh ones and they both work fine)
200 g powdered sugar.
65 g ground blanched almonds.
60 g ground hazelnuts.
30 g granulated sugar
20 g coco.

Ganache filling
150 g dark chocolate
75 g heavy cream
4 tablespoons hazelnut praline

Preparation

1- Preheat the oven to 320 f. Line 2 baking sheets with parchment paper and set aside.
2- In a food processor, combine the ground almonds, ground hazelnut and powdered sugar. Mix until you get a thin powder. Remove from the bowl, add the coco and Sift the mixture. Set aside.
3- Beat the egg whites with a pinch of salt until soft peak. Gradually, add the granulated sugar and continue to beat until the mixture becomes shiny. At this point, you add the desired food coloring (if using).
4- Sift the dry ingredients over the egg whites in 3 steps. fold the mixture until shiny. Do not over mix.
5- Fill a pastry bag fitted with a round 1/2 inch tip with the batter and pipe evenly the cookies leaving 2 inches between them. Let the cookies rest for about 20 minutes.
6- Cook the macarons for 12 to 15 minutes. Let them cool before filling with the ganache.

Ganache Filling
1- Finely chop the dark chocolate and put in a bowl.
2- Heat the cream and pour it over the chopped chocolate. Let stand for 1 to 2 minutes then whisk it gently until smooth and shiny. Let the ganache cool a little bit then add the praline.
reade more... Résuméabuiyad

Clafouti

I must say that I am not a big fan of clafouti nor blueberries. I tried making clafouti couple times and every time I got disappointed. I either don't like the texture of the clafouti itself, or the cooked fruits. However, this time, it came out different and quite tasty. I actually loved the taste of the cooked blueberries and the clafouti didn't taste too "eggy". Plus, I added some orange zest since I didn't have any lemons on hand. I actually prefer the orange-blueberry combo better.


Blueberry Clafoutis


Recipe

4 large eggs
1 cup minus 2 tablespoons sugar
1 cup milk
3/4 cup all purpose flour (if you want it more cakey use a whole cup)
2 cups blueberries
1/2 tsp vanilla
2 tsp orange zest
Pinch of salt

Preparation

1- Preheat the oven to 350. Spray 8 ramekins with cooking spray and arrange some blueberries on each of them. Set aside.
2- Mix the eggs and sugar until fluffy. Add the milk, vanilla and orange zest.
3- Sift the flour and salt over the wet ingredients and mix until evenly combined.
4- Pour the mixture over the blueberries. Arrange the ramekins on a baking sheet.
5- Bake the clafoutis for 40 to 45 minutes or until lightly golden. sprinkle with confectioner sugar and enjoy warm or cold!


reade more... Résuméabuiyad

Simple & yummy!

This recipe is really simple, in fact I found it in a food magazine and it was on the kids page. I thought I'd try it for my picky eater, he adored them and I did too. The method of making these muffins is simple yet it yielded to a great result. I've tried fairly more complicated muffin recipes and didn't get a nice result or should I say didn't get what I'd expect from a good muffin: not too sweet, moist and light. I think I can use this recipe as a base and explore with other flavors.

Nutella Muffins

Recipe (10 to 11 muffins)

100 g unsalted melted butter.
1 large egg.
2 heaping Tbsp Nutella.
100 ml milk.
180 g all purpose flour.
70 g sugar.
1+1/2 tsp baking powder.
Pinch of salt.
Nutella
Chopped hazelnuts

Preparation

1- Preheat the oven to 350 F. Line a muffin tin with muffin cups.
2- Combine the melted butter, the egg and the nutella. Mix with a hand held mixer until light and fluffy. Add the milk. Sift together the flour, sugar, baking powder and salt.
3- Add the dry ingredients to the wet ones and mix until just combined (do not over mix)
4. Divide the batter between the muffin cups and bake for 20 to 25 minutes or until a toothpick inserted comes out clean.
5- Let the muffins cool completely. Ice each muffin with nutella and sprinkle with chopped hazelnuts.

Bon Appetit!
reade more... Résuméabuiyad
Waffles


I never tried waffles before because simply I never thought of buying a waffle maker. I have every kitchen utensil you can imagine .......... except that little waffle maker.
I also never had waffles before and never been tempted to make them. Do they taste like pancakes, or may be they have a crunchy texture more like cereals or may be waffles have a cake like texture??
So, I had to wait to come to mom's house who, obviously, has a waffle maker to try "les gaufres". Browsing for a good recipe wasn't that easy though :) because...........well how do I know it is a good recipe if I don't even know what to expect??!!! At the end of my mysterious waffle journey, I ended up choosing a simple french recipe. I only added sugar to te recipe because without sugar it tasted a little bit blind. It was a pretty good one because the waffles tasted so good and were crunchy on the outside yet soft in the inside. With a drizzle of honey and butter Mmmmm!!! Even if this is not the way they were supposed to be, I liked them that way!!
Recipe (In grams)
250 g All purpose Flour
3 large eggs
80 g melted butter
500 ml milk
4 tablespoons granulated sugar
2 teaspons baking powder
1/2 teaspoon table salt
Preparation
1- Melt the butter and set aside to cool.
2- Mix to combine: flour, sugar, baking powder and salt.
3- lightly beat the eggs and mix with the milk and the cooled melted butter. Add to the dry mixture and whisk to combine. Do not overmix. let the batter rest for 1 hour before cooking.
Serve the waffles with honey and butter. Enjoy!
reade more... Résuméabuiyad

I know what you've been asking yourself: where is she!!!???? Well, I'm on vacation for 3 whole months................... AAAAAAAAAAhhh I miss my kitchen, my tools, baking and photography!!!!! But I think I needed some kind of break because during the last days I felt my head was the next thing to be put on a baking sheet!!!!
Have a great summer!
reade more... Résuméabuiyad

Lemon Blackberry Tart


Tarts are my favorite kind of pastry. I like making them and eating them, especially fresh fruit ones. I love the combination of their sweet crunchy pastry dough, the creaminess of the filling and the fresh topping.

Lemon tart is among my favorites too. I like mine not too sweet, not too tangy, just the right balance of flavor and full of freshness from the lemons.

I make my lemon tart with a sweet pastry dough, which is a pate brisee kicked up a little bit! I add some yolks, sugar and vanilla. For the filling, I sometimes use lemon curd, sometimes a lemon pastry cream. In this particular tart, I used another kind of cream that I tried for the first time. I've been reading blogs about Dorri Grennspan's famous lemon cream that she herself got from the famous French pastry king "Pierre Hermé" I mean how wrong can you go with a recipe coming from this pastry chef!!!?? The cream is basically a lemon curd. The difference is that the butter is added to the cream after cooling a little bit, then it's whipped in the blender, so you end up with a light, very creamy result.
The cream was a bit too buttery and rich to my taste, especially for a tart, but I thought may be adding some berries to the tart would cut this richness a little bit and the berries can bring out the lemon flavor even more and make the tart taste even fresher.

Pate Sucree
200 g All Purpose Flour
100 g unsalted butter, cubed and cold.
1 tablespoon granulated sugar
2 tablespoons powdered sugar
1 egg yolk
1/2 tsp vanilla extract
pinch of salt
1 to 2 tablespoons cold water

Mix the flour, sugars and salt. Add the cubed cold butter. Rub the mixture with your hands until crumbly. Add the vanilla, egg yolk and 1 tablespoon of water. Work the mixture lightly until a dough forms. Add the other tablespoon of water if needed. Cover the dough with plastic wrap and refrigerate for at least half an hour.

Lemon Cream (Pierre Herme's French Lemon Cream)
1 cup sugar
Finely grated zest of 3 lemons
4 large eggs
3/4 cup freshly squeezed lemon juice (from 4 to 5 lemons)
2 sticks plus 5 tablespoons (21 tablespoons; 10 1/2 ounces) unsalted butter, at room temperature and cut into tablespoon-sized pieces

1. Put the sugar and zest in a large metal bowl that can be fitted into the pan of simmering water. Off heat, work the sugar and zest together between your fingers until the sugar is moist, grainy and very aromatic. Whisk in the eggs followed by the lemon juice.
2. Fit the bowl into the pan (make certain the water doesn’t touch the bottom of the bowl) and cook, stirring with the whisk as soon as the mixture feels tepid to the touch. You want to cook the cream until it reaches 180°F. As you whisk the cream over heat—and you must whisk constantly to keep the eggs from scrambling—you’ll see that the cream will start out light and foamy, then the bubbles will get bigger, and then, as the cream is getting closer to 180°F, it will start to thicken and the whisk will leave tracks. Heads up at this point—the tracks mean the cream is almost ready. Don’t stop whisking and don’t stop checking the temperature. And have patience—depending on how much heat you’re giving the cream, getting to temp can take as long as 10 minutes.
3. As soon as you reach 180°F, pull the cream from the heat and strain it into the container of a blender (or food processor); discard the zest. Let the cream rest at room temperature, stirring occasionally, until it cools to 140°F, about 10 minutes.
4. Turn the blender to high and, with the machine going, add about 5 pieces of butter at a time. Scrape down the sides of the container as needed while you’re incorporating the butter. Once the butter is in, keep the machine going—to get the perfect light, airy texture of lemon-cream dreams, you must continue to beat the cream for another 3 minutes. If your machine protests and gets a bit too hot, work in 1-minute intervals, giving the machine a little rest between beats.
5. Pour the cream into a container, press a piece of plastic wrap against the surface to create an airtight seal and chill the cream for at least 4 hours or overnight.

Tart Preparation

Preheat the oven to 375. Remove the dough from the fridge and roll it out on a floured surface or between two sheets of plastic wrap. Cut out circles and align them on your tart molds. Cover each tart shell with aluminum foil and put in some beans. This will help the tarts keep their shape during baking. Bake for 15 minutes then remove the foil and continue baking until lightly brown. let the tart shells cool.
When completely cool, fill each tart with the cream and decorate with blackberries or raspberries. sprinkle with powdered sugar and enjoy!

reade more... Résuméabuiyad

Croissants Parisiens


what a perfect way to start a morning with a flaky, buttery croissant coming right from.....................your oven! I love croissants and viennoiseries in general. I've been trying many recipes hoping desperately to get the best result, until I bought Jacques Torres cookbook "Dessert Circus" I think it's the best purchase I ever made in my life:) This book is unbelievable not to mention his writer who is the best pastry chef in the whole world!

The making of croissant is not an easy task I must admit. It is a long process that needs patience. Aaaah patience!!!!!!!!!! I'm not a patient person especially when I'm in the kitchen. I can't wait to unmold my cake as soon as it comes out of the oven, I don't let my custard cool completely before unmolding it, I eat it warm..........and the list goes on. But in the case of croissants, I have to make sacrifices, just have to! " make your dough ready for tomorrow, you'll have fresh croissants for breakfast"


Although this dough doesn't have to stay in the fridge overnight, the result is much better if you do so. When you let the dough (and any yeast based one) sit overnight, this will allow for a slow fermentation which helps develop the distinctif flavor found in bakery goods.

Recipe

3 1/2 cups bread flour (all purpose flour can be substitued)
3 tablespoons melted butter (unsalted)
1 1/2 tsp salt
2 Tbsp sugar
2 teaspoons instant yeast
1/2 cup warm water
1/2 cup milk.
1 cup + 2 TBsp (9oz) soft unsalted butter


Egg wash

2 egg yolks
1 whole egg
1/4 cup whole milk

Dissolve the yeast in the warm water along with the sugar. In a bowl of a stand mixer, place the flour, salt, milk and melted butter. Mix on medium speed until combined. Add the dissolved yeast and mix until the dough is well combined and no longer sticks to the sides of the bowl. Cover the dough and let it rest for 30 mn.Roll out the dough to an 8 by 15 inch rectangle. wrap the rectangle and let it rest in the fridge for 2 hours.Remove the dough from the fridge. Spread the soft butter over the two thirds of the dough. Give the dough a single fold: fold the left butterless third over the center, then the other third to the right. the dough should ressemble a folded letter. Roll it out to a 10 by 30 inch rectangle. Give the dough a book fold: Fold each short end to the middle so they meet but do not overlap. then, fold one half over the other. wrap the dough and let it set in the fridge for at least 2 hours or even overnight.remove the dough from the fridge and give it another single fold. wrap and let it rest in the fridge for 30 mn.On a floured surface, roll out the dough to a 10 by 36 inch rectangle. Cut out triangles and shape into croissants. Let the croissants rise until doubled in volume, from 1 1/2 to 3 hours.


Preheat the oven to 400 F. Make the egg wash by mixing the yolks, whole egg and the milk. Brush the croissant with the egg wash and bake until golden brow 10 nto 12 minutes.


reade more... Résuméabuiyad

Chocolate chocolate.......!!


When I saw this recipe from "Julia and Jacques Cooking at Home" I knew it would be the best chocoalte roulade I would ever make! I have to admit that I ADMIRE Jacques Pepin. His way of playing with food amazes me. I used to watch his show on PBS "Fast Food My Way" and I enjoyed watching him make dishes that were simple and elegant, the French way!!

His recipe for this roulade is so simple yet so sinfully delicious. The batter is a soufflee batter: a ganache folded into egg whites. It is so light ( I'm not talking calorie wise though!) and chocolaty and rich and.....well just scrumptious!!
Biscuit:
1 cup heavy cream
8 ounces semi-sweet or bittersweet chocolate cut into small pieces
7 egg whites
2 Tablespoons granulated sugar

Filling:
1 cup heavy cream
2 tablespoons powdered sugar
1 tsp vanilla extract

Preheat oven to 350. Line a 11-by-17 or 13-by-18 jelly roll pan with buttered parchment paper.
Heat the cream to the simmer in a sauce pan. Add the chocolate and stir until melted thoroughly. Let cool for a few minutes. Whip the egg whites with the 2 tablespoons of sugar. Scoop some of the egg whites into the chocolate mixture and stir to blend. Gently fold in the rest of the whites. Pour the batter into the prepared pan and bake 10 to 12 mn. Cool in the pan to room temperature.Prepare the filling by whipping the heavy cream with the sugar and the vanilla. Spread the cream over the cake and roll. Enjoy!
Just to mention, this roulade has a very intense chocolate flavor, I personally make it with semi-sweet chocolate, but if you're a real chocloholic use bittersweet chocolate.

reade more... Résuméabuiyad

Pistachio Lime Cake


This cake is so moist and flavorful. when you bite into it, you get this burst of lemon and lime flavors along with the nutty rich flavor of the pistachios. I love citrus flavored baked goods: lemon, lime, orange.....I can add them to any dessert!!
People may get intimidated by "pistachio Paste".....what is pistachio paste anyway??!!! just like almond paste , pistachio paste is a mixture of ground pistachios and sugar. The sugar is cooked with some water, brought to a quick boil and added to the pistachios. You'll end up with a green paste. In this recipe I added some food coloring to get a more greenish color. This cake can be made with almond paste, therefore, you can add any food coloring to the paste since almond has a neutral color.

Recipe

3 eggs
150 g Granulated sugar
180 g All purpose flour
70g melted butter
100 ml Heavy cream
50g pistachio paste (recipe follow)
1 tsp baking powder
2 tablespoons chopped candied lemons
zest of 2 large limes
1 tablespoon lime syrup

Preparation:

1-Preheat the oven to 375. Grease a 9 by 5 loaf pan.
2- Combine the eggs, sugar, candied lemon and lime zest. Mix until light and fluffy. Add the heavy cream.
3- Sift the flour, salt and baking powder. Add to the egg mixture and mix until combined. Add the melted butter.
4- Heat the pistachio paste with the lemon syrup (you might use less or more depend on the paste) until soft (do not overheat). Mix the paste with 1/3 of the batter. Spread half of the white batter, then the pistachio batter then the remaining white batter.Bake for 15 mn then reduce to 350 and bake until golden brown and delicious!

Pistachio Paste

100g finely ground pistachios
50 g granulated sugar
1 tablespoon water
Powdered sugar.

Over medium high heat, bring the sugar and the water to a quick boil. The sugar should be all melted. Meanwhile, put the pistachios in the food processor. Add the hot syrup and process until it forms a paste. If the mixture is too dry add more water a teaspoon at a time. If the mixture seems too liquid add powdered sugar. You should end up with a smooth lightly firm dough. Cover in plastic wrap. It can be kept at room temperature for 2 to 3 days or refrigerated for a longer period.
reade more... Résuméabuiyad