Pages

.

Veggie and Cheese Biscuits

We've almost finished our first week of school and I am tired!  I'm glad we have a long weekend coming up.

This is the first year that I am driving 3 kiddos to 3 different school buildings.  I'm happy that the kids get to stay at their schools even though we have moved 20 minutes away into a rental house while our new home is being built.  I'm not as happy about becoming a full-time chauffeur and waking up at 5:45am.  Oh, and did I mention that our rental house only has 1 bathroom for all 6 of us to get ready in the morning!  Crazy, I know.  But, it's only temporary until our home is finished sometime next year. 

I've been trying to plan ahead as much as possible for meals since we are very busy right now.  My son joined the cross country team this year and by the time I have picked everyone up from school and practice, it's already dinner time when we get home.

So, I need some quick and healthy recipes like these Veggie and Cheese Biscuits.  These biscuits can be made ahead of time and simply reheated when needed.  I made 3 batches last week and stored some in the refrigerator and freezer.  They reheat well in the microwave and make a great snack or side dish.  My mom made these when I was a kid and I have always liked them. 

Ingredients (printable recipe)
1 (12 oz) can Pillsbury Grands Jr. buttermilk biscuits (make sure you get the Junior size)
2 cups chopped broccoli, cooked and drained
5 oz. cheddar cheese, shredded
1 large tomato (or 2 smaller tomatoes), diced
1/4 cup minced green onion or sweet onion
1 1/2 Tablespoons melted butter
Salt to taste
Cooking spray for muffin pan
Directions
Preheat oven to 400 degrees F. Spray muffin pan with cooking spray. Roll out biscuits into 4 inch circles. Press into muffin pan. Set aside.

In a bowl, combine remaining ingredients. Mix well. Spoon equal amounts into each biscuit. Bake until golden brown, about 12-13 minutes. Remove biscuits from pan and let cool slightly. Makes 10 filled biscuits.

Store extras in refrigerator and reheat in microwave for about 30 seconds. I've also stored these in the freezer and reheated them in the microwave for about 2 minutes at 80% percent power. (Each microwave is different, so you may need to adjust the times to what works with your microwave.)

Source: Mom

First, I washed and diced the veggies. I steamed the broccoli before I chopped it.
Next, I rolled out my biscuits and put them inside the muffin pan.
Then, I mixed up the rest of the ingredients and........
started filling the biscuits inside the muffin pan.
There should be just the right amount of filling for 10 biscuits. Keep Packing and filling all the cups until you're out of the veggie/cheese filling. (I wish the cans of biscuit dough contained 12 biscuits, instead of only 10, oh well.)
Ready to eat!
The Results... 
Delicious!  My husband doesn't like canned biscuits (he prefers homemade), but he still likes these Veggie and Cheese Biscuits.  I like how easily they reheat in the microwave.  I can warm a couple up for a quick lunch in the afternoon.  The kids were split on these.  My son liked them, but my daughters didn't care for them, but they are not big fans of broccoli or onions.

This is a recipe you can "play" with and change the veggies if you like.  Just soften/cook any veggies that are crunchy like broccoli before adding them to the mix.

I'd like to know what quick and healthy recipes you make!  Share them here or over at our facebook page.  Thanks!

I share recipes when I can at these linky parties.
reade more... Résuméabuiyad

Whoopie Pie Cake

I've never made whoopie pies.  Mostly because I don't like the idea of baking and frosting a lot of little pies.  So, when I found this idea over at Cookies and Cups to make just one ginormous whoopie pie, I thought 'I can do that.'

Ingredients (printable recipe)
1 box of chocolate cake mix, prepared per package directions + 1 egg
Cocoa powder for dusting the cake pans
1 cup butter, room temperature
2 cups marshmallow creme
3 cups powdered sugar
1/2 cup heavy cream
1 cup semi sweet chocolate chips
Directions
1. Preheat oven to 350 degrees F. Grease 2 (9 inch) round cake pans and dust with cocoa powder, set aside.
2. Prepare cake mix according to package directions, but add an extra egg to the mix.
3. Split batter evenly between the 2 cake pans and bake for approximately 25 minutes or when top of cake springs back or toothpick comes out clean. Allow cakes to cool completely.
4. In stand mixer, beat butter and marshmallow creme together until smooth. Turn mixer to low and slowly add powdered sugar. Turn mixer back up and continue to mix until smooth, about another minute.
5. Spread the filling on top of one of the cakes. Top the filling with the other cake.
6. In small saucepan, bring heavy cream to almost a boil. Remove from heat and whisk in chocolate chips until smooth. Allow to cool for 10 minutes and then pour on top of cake.

Notes: Spray the measuring cup with cooking spray before adding the marshmallow creme. It will slide right out instead of sticking.

Adapted from Cookies and Cups
 
My regular cake pans are in storage, but these aluminum ones worked just fine. I buttered them really well before I dusted with cocoa powder.
Cooling off
Buttery, marshmallow creme filling mmmmmmmmmmm!
Here's all that marshmallow Buttercream on top of the first cake.
When the other cake gets put on top of the filling, it looks like a huge Whoopie Pie! BUT, we are not done. There's still the chocolate ganache to pour on top.
Here's your slice. Enjoy!
The Results...
I loved how simple this cake is to make.  My husband LOVED how it tasted and gave Whoopie Pie Cake a full 5 stars! 

The kiddos told me it was too sweet.....WHAT?!  They also told me that I gave them too much cake.  REALLY?!  I thought to myself, 'who are these kids and where are the ones that ask for dessert after we eat waffles or beg for cookies at 8am?'  cRaZy!  They still told me that they liked this cake and gave it 4 stars, though.

I share recipes at these linky parties.
reade more... Résuméabuiyad

Discover Ways To Prepare Creative Home-Made Cupcakes, Desserts, Home Decorations and Fashioned Stuff

Discover new ways on preparing home and self-stuffs artistically online! Baking cupcakes, cooking delicious recipes and creating artistic home decorations and even jiving to new trends of fashion stuffs like of nail arts and hair styles can be very easy for you with the help of this site. This site will be your helpmate to do out of this world creative creation. Also, offers a step-by-step tutorial demonstration of activities. It would be very helpful for you to have varieties of creations. The LIKE IT SHORT site has its updated advertisements of new recipes and trends which will definitely help you discover and try new possessions. Moreover, this site will teach you on how to be creative, resourceful and initiative in many ways that could make complex ideas of arts from scratch.And, will lead you not to be dependent on ready-mades instead let yourself to be the one to create and design. So let's get started!

When talk about foods and desserts! Creative evolution of cooking recipes and baking cakes dominates the nation rapidly. We can see and appreciate those stuffs at parties like birthdays, weddings, anniversaries and more. Through this site, you don't need to hire caterers or even buy expensive ready-made foods and desserts for party servings;you can now make it by yourselfdeliciously and creatively. This site offers you a detailed ways on how to prepare cupcakes, healthy dishes and more from ingredients up to plating.

What about having gifts and souvenirs? There is no need to buy expensive ready-made gifts and souvenirs because you can actually have it home-made. You can now customize simple presents to make extraordinary offerings. Even a simple thing can become complex with the use of imaginative skills. Try to check out some available wedding souvenirs and birthday gifts in this site and you can have it in your most creative and convenient way. Remember that hand-made is greatly appreciable. However, following this site will teach you new ideas of inspired gifts.

How to make house a sweet home? Hmmmm...You may think that having an attractive house is expensive, you may think it wrong. Other than having luxurious furniture and decorations, make your own styles to make home utensils attractive and appreciable in to the eyes of others. Make use of old stuffs that can revamp a new one. This site has various challenging ways that will make you fun while altering the old ones.

Lastly, Be on the trend! Indeed, fashion moves rapidly. Affording the new trends every after another might be a ridiculous to have. This site will help you to have customized yet elegant bracelets, necklace, bags and other fashion stuffs. You don't need to spend more time and money to get out and buy new fashioned trends, with the available tutorials that this site offers, you can have it all.

Just follow the steps that the site offers and you'll be experiencing a simple yet creative masterpiece and feel like a master. There's no need for you to contact experts or even spend big money to be on trend. Try to check out every new updates that this site have and you'll be having a standout of arts that you never thought. It's never too late to start, so why start now? THINK, DISCOVER, FOLLOW and creativity will follow.

Lucy Handler Photo Click Here for more exciting blogs and recipes. Do not miss the chance to visit the website. You can also share it to your friends. So check it out now.
This post was made using the Auto Blogging Software from WebMagnates.org This line will not appear when posts are made after activating the software to full version.
reade more... Résuméabuiyad

Savvy Treats Delivering & Catering to DC, VA, MD

At Savvy Treats we strive to make your day as sweet as possible with our deliciously made cupcakes. No longer do you have to walk all the way over to a store or a bakery and go to the hassle getting your order carefully back home in one piece. We'll do it for you! Savvy Treats is now delivering cupcakes to your doorstep anywhere in DC, MD or VA. We offer you a wide variety of flavours to choose from:

Carrot Cake with Whipped Cream Cheese FrostingRed Velvet Devils Food with Whipped Cream Cheese FrostingVanilla Bean Cake with Vanilla Bean FrostingGerman Chocolate with Chocolate FrostingSalty Caramel with Salted Caramel Butter Cream FrostingLemon Cake with Lemon FrostingChocolate Cake with GanachePeanut Butter BlossomPumpkin Cake with Apple Butter FrostingToffee CrunchChocolate MochaCupcake of the Month: Pink Lemonade

You can order any of the above in any assortment with a minimum order of 12. A new addition to our shop is the mini-cupcake which is available in the same flavours as mentioned with a minimum order of 24.

Savvy Treats at Your Event

No matter what event you are hosting, be it a birthday, a wedding, a Bar Mitzvah or any other festivity, we will make sure that our cupcakes are delivered safely to you. We will gladly accept your calls and messages for the details, and if you are unable to do so we also have an online order form which you can fill out in a jiffy.

Apart from that we also provide you with the service of catering at your party. You can contact us and tell us what it is that you require from our existing menu or have it customized especially for you. So whichever event that you are planning, let us make it a little more delightful.

Party Favor Fun

With our new party favors, you can have your guests go home with their own Savvy Treats. Choose from our variety of cupcakes or mini-cupcakes and add your own touch with a personal message. Include them in your order as a perfect way to thank your friends for being a part of your special day. Please keep in mind that currently our catering and delivery system is limited to the DC, MD and VA metropolitan area.

Savvy Treats knows that quality products are very important to the consumer today. We delivered Wedding Cakes DC in Washington.
This post was made using the Auto Blogging Software from WebMagnates.org This line will not appear when posts are made after activating the software to full version.
reade more... Résuméabuiyad

Chicken Spinach Artichoke Lasagna

If you're looking for a quick dinner, this isn't it.  I'm not gonna lie.  You'll need to plan on spending some time in the kitchen to make Chicken Spinach Artichoke Lasagna.  I had a free afternoon this week and decided to give this recipe a try. 

Ingredients (printable recipe)
9-10 lasagna noodles
2 Tablespoons olive oil
1/4 cup diced onion
4 cloves garlic, minced or pressed
1 pound skinless, boneless chicken breasts, cut into cubes
1 teaspoon Italian seasoning
salt and pepper
2 (14 oz.) cans artichoke hearts, well-drained
2 cups ricotta cheese
2 cups shredded mozzarella cheese, divided (I used a mix of mozzarella and provolone)
1 beaten egg
1/2 tablespoon dried parsley flakes
3 cups fresh spinach leaves, stems removed
Sauce:
4 Tablespoons butter
1/4 cup all-purpose flour
2 cups milk
dash of nutmeg
1/2 cup grated Parmesan cheese
salt and pepper
Directions
1. If using dried lasagna noodles, prepare them according to package directions and set aside.
2. In a large skillet heat the olive oil over medium heat. Add onion, garlic, chicken, Italian seasoning and season with salt and pepper.
3. Cook stirring occasionally until chicken is cooked through. Cut the artichokes in half and then in half again, dry off any moisture with paper towels. Stir them into the chicken and cook 2-3 minutes. Remove from heat and allow to cool.
4. In a large mixing bowl combine the ricotta, 1 1/2 cups of mozzarella, the egg, and parsley.
5. Make stacks out of the spinach leaves and cut them into thin strips (chiffonade). Mix them into the ricotta mixture---it will be thick.
Make the Sauce:
6. In a large, heavy duty saucepan, melt the butter over medium-low heat. Whisk in flour and cook about 3 minutes, whisking often. Slowly whisk in milk. Turn heat up and bring to a simmer.
7. Maintain a simmer for about 4 minutes, stirring often. Turn heat down to low and stir in nutmeg, Parmesan cheese and a pinch or two each of salt and pepper, continue stirring until cheese is melted. Remove from heat.
Assemble the Lasagna:
8. Preheat oven to 375 degrees F. Butter a 9x13 inch baking dish.
9. Add a very thin layer of sauce over bottom of pan, then a layer of noodles covering the bottom completely from edge to edge. Spread 1/2 the ricotta mixture evenly from edge to edge, then top with 1/3 of the chicken artichoke mixture followed by 1/3 of the sauce.
10. Cover the filling with another layer of noodles followed with the remaining ricotta mixture, 1/3 of the chicken and 1/3 of the sauce.
11. Cover with another layer of noodles followed by the remaining sauce, the remaining chicken mixture and the 1/2 cup mozzarella cheese.
12. Bake 45-50 minutes until bubbly and hot in the middle. If the top starts to get too brown, tent with aluminum foil. Allow to set 10 minutes before cutting into squares and serving.

Adapted from Cinnamon Spice and Everything Nice

I used dried lasagna noodles. I prepared them according to their package directions first and set them aside. I sprayed a baking sheet with cooking spray and put the lasagna noodles on top. I also sprayed between each layer of noodles to keep them from sticking to each other.
The chicken and artichoke mixture.
The ricotta and spinach mixture.
Homemade sauce. Now, it's time to start assembling.
I lightly buttered the baking dish and spread a thin layer of sauce on the bottom.
Lasagna noodles.
Ricotta and Spinach mixture.
Chicken and artichokes mixture and more sauce.
More noodles.
Ricotta and Spinach again.
Chicken and Artichokes.
More Sauce.
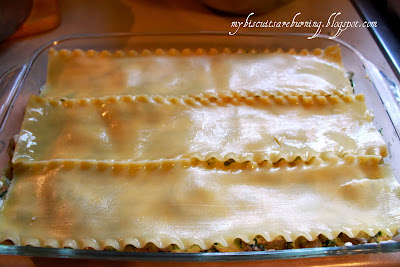
Noodles one more time.
The rest of the sauce.
The rest of the chicken and Artichoke mixture.
Sprinkle some cheese on top and it's ready for the oven.
Baked, bubbly hot and toasty on top. Don't forget to let it set about 10 minutes before serving.
The Results...
Was the extra time spent in the kitchen worth it?  Yes, it was!  Everyone liked this different version of lasagna.  I heard 3 1/2 to 4 stars (out of 5) for this recipe.  My husband really liked this lasagna.  He gave it 4 stars and had 4 servings!  The kids gave this recipe 3 1/2 stars.  They thought it was good, but they prefer traditional lasagna with tomato sauce.   

We love creamy spinach and artichoke dip and this lasagna had similar flavors in it along with tender pieces of chicken and homemade alfredo sauce.  Chicken Spinach Artichoke Lasagna is worth the extra effort!


I share recipes at these linky parties.
reade more... Résuméabuiyad

Different Ways to Prepare Dream Cake

While you plan to bake a perfect dream cake, you need to follow certain guidelines to get it right. Whenever you bake a cake, it is always advisable to use the baking tin size as mentioned in the recipe. And, most importantly, you need to line it well. Baking parchment is a good choice for lining because it is non-stick. Oil dusted flour or softened butter dusted flour could be used as alternatives. However, make sure that you do not use too much fat as it might end up frying the sides of the cake. Below mentioned are a few recipes to bake a lovely dream cake.

Recipe 1

Ingredients required to prepare this dream cake are:

Bottom layer:

All purpose flour - 1 ½ cPacked brown sugar - ¾ cButter - ¾ c

Top layer:

Sweetened condensed milk - 11 ozVanilla - ½ tspChopped walnuts - ½ cChopped glace cherries - 1/3 cShredded coconut - 1 ½ c

Preparation: Mix the sugar and flour together to make the bottom layer. Cut in the butter and combine it till it is crumbly. Pack into an ungreased pan of size 9"x13". Bake for 10 minutes or till it turns golden in color in the oven at 350 degrees F.

To make the top layer, in a bowl stir all the five ingredients together. Spoon this mixture over the bottom layer and spread it. Bake for 30 minutes or till it turns golden in color in the oven at 350 degrees F. Before serving, cool the cake.

Recipe 2

Ingredients required to prepare this dream cake are:

Yellow cake mix - 1Eggs - 4Oil - ¾ cCrushed pineapple - 20 oz, with half the juice

Coconut pineapple icing:

Crushed pineapple with the juice - 20 ouncesMargarine - 1 stickPowdered sugar - 16 ouncesCoconut - 1 can

Preparation of the icing: Heat together margarine and pineapple. Boil for 2 minutes. Add the coconut and the powdered sugar. Keep it aside and do ensure to keep it warm.

Cake: Beat together all the ingredients for the cake with a mixer for 4 minutes. Pour the batter into the greased and floured baking pan of size 9x13 inch. Bake the mixture in the oven at 350 degrees Fahrenheit for 35 minutes or till a toothpick comes out clean after inserting it into the middle. Cool it and spread the icing over the cake.

Recipe 3

Ingredients required to prepare this dream cake are:

White cake mix - 1 regular-size packageCherry gelatin - 3 ozBoiling water - 1 ½ cSoftened cream cheese - 8 ozWhipped topping - 2 cCherry pie filling - 21 oz

Preparation: According to the package instructions, prepare the cake mix using a greased pan of size 13x9 inch. Bake at 350 degrees F for 35 minutes. In boiling water, dissolve the gelatin. Cool the cake for 5 minutes on a wire rack. With a wooden skewer, poke holes in the cake and slowly pour the gelatin over the cake. Cool it for a few minutes. Cover and keep it in the fridge for at least half an hour.

The Danish term for dream cake is drømmekage . You can get some amazing recipes for dream cake at one of the finest Danish websites - Femina .
reade more... Résuméabuiyad

Cartoon Cakes- An Innovative Creation For Your Child Birthday Parties

To put a million dollar worth of smile on someone's faced. There are some special occasions in our lives and we love to celebrate those moments with full joy and zeal. We all throughout the year wait for a special event to some so that we can have a get together with our families, relatives, friends etc. We take considerations regarding the celebration procedures of those beautiful moments. We all like to organise some sort of special activities or attractive agenda's in our parties to make them memorable.

Party will not be called a party until it possesses some qualities of exciting and memorable moments. We all have creative and super experimental minds and love to figure out new ways of celebrating such moments in a unique style. We look for something which is better than the previous one. We anticipate what we will be doing this time and try to grab those opportunities which could pull more adorable eyes toward the celebration.

Photo cakes or to be specific cartoon cakes have arrived to add a new dimension to such enthusiastic party lovers. Those who wish to make the moments joyous and unforgettable, must give it a shot. "Cartoon cakes" suggests, is a genre of cake which has a cartoon printed on the top of the delicious creamy stuff. It is an innovative idea in which the snap of a cartoon character is printed on the top of the delicious item.

We like to celebrate our birthdays and yes the first thing which now has become most important for a birthday celebration is a "cake cutting ceremony". This is the best part which the birthday boy/girl enjoys during the wholesome celebration of the evening. The best enjoyable moments of a birthday party are related to cake cutting when everyone looks at you with big smile on their faces.

Cartoon cakes add a new segment to the story line of photo cakes. Parents love to celebrate the birthday of their child with exciting gifts. Personalized cake with a cartoon character's print is the best gift which parents can give to their child. Children admire cakes and love the delicacy of the cakes. And yes they love the cartoon characters at most. So how would it be like giving your child a "cartoon cake" as a birthday present?

Cartoon cakes are not only focused for children segment. Elders can also use them for their event celebrations. We all used to admire cartoon channels during our childhood. So why not recollect those wonderful moments of rejoice and cartoon creatures on a special occasion? Why not live the cartoony life once again?

Cartoon Cakes are how available in different genres, sizes, forms and architectures. Chhota Bheem photo cake is perhaps the most popular one. These customized cakes are made up of edible ingredient and cause no harm to body. Different tastes life vanilla, tutti-fruity, butter scotch etc are available in market and that too with the portrait of your favorite cartoon character. You can choose a character according to your choice given a lot of options characters such as pokemon, Doraemon, Ban-10, Barbie Doll, powerpuff girls etc are available.

Also cartoon cakes are not meant only for celebrating your child's birthday rather you can use them to celebrate any happy moment of your life achievements of child etc. In metropolitan cities like Delhi, Noida, Ghaziabad, Gurgaon this trend has marked its presence in the market and contributing to gift market significantly. So don't keep waiting. Just get ready and bring a healthy, delicious, unforgettable and never ending smile on the focus of your beloved ones.

Hitesh aggarwal write articles for cakes and it's categories like cartoon cakes in Delhi, Doraemon cakes in Noida, pokemon cakes in Ghaziabad, Barbie doll cakes in gurgaon and more. For more information just visits our website today:
reade more... Résuméabuiyad