Pages

.

Showing posts with label BTC Dessert Challenge. Show all posts

Fresh Peaches and Cream Cookies

I hope you are enjoying summer!  Summer is always too short for me.  Around this time I find myself hoping summer wasn't coming to an end so soon.  The kiddos and I have been thinking of what fun things we can still fit in during these last few weeks until school starts.  Here are a few things on our "to-do list": another zoo trip, another day at the pool, more fishing and a family camping trip.

Fresh fruits and veggies are a wonderful part of summer.  Right now we have fresh peaches everywhere!  Last summer I found our favorite recipe for peach cobbler, Easy Peach Cobbler.  This year I found this recipe for Fresh Peaches and Cream Cookies.

I thought this recipe would be perfect for the Behind the Curtain Dessert Challenge this month.  Head over to The Lady Behind the Curtain to learn more about this challenge.  Basically, we are assigned two ingredients and the challenge is to make a delicious dessert with them.  This month the assignment is Peaches and Cream, yum!

Ingredients (printable recipe)
2 1/4 cups all-purpose flour
3/4 tsp. baking soda
1/2 tsp. salt
1/2 tsp. cinnamon
1 cup unsalted butter, softened
1/2 cup white sugar
1/2 cup brown sugar, firmly packed
1 egg
1 tsp. vanilla extract
1 1/2 cups fresh, diced peaches (skin removed)
1/2 cup white chocolate chips
Glaze:
1/2 cup powdered sugar
1-2 Tbsp cream (or enough to make a drizzle consistency)
1/4 tsp vanilla extract
Directions
1.Preheat oven to 350 degrees F. Grease or line cookie sheets with parchment paper. In a large bowl, combine flour, baking soda, salt and cinnamon. Stir together and set aside.
2. Using a sharp knife, remove the skin from peaches and cut into small chunks. Place the diced peaches on a paper towel and set aside.
3. In another large bowl, cream together butter and sugars until light and fluffy, about 3 minutes. Add egg and vanilla. Beat until combined. Add flour mixture and beat on low speed until well incorporated. Gently fold in peaches and white chocolate chips.
4. Use a cookie scoop or tablespoon to drop dough in rounded spoonfuls onto the cookie sheets. Leave plenty of room between cookies to allow for some spreading. Bake about 10-12 minutes until light golden brown. Cool 1 minute on cookie sheet, then transfer to wire racks to cool completely.
5. Mix together the powdered sugar, cream and vanilla until smooth. Drizzle lightly over cookies while still warm. Allow to cool. Enjoy!

Notes: Stir in the peaches and white chocolate chips well. It says 'gently fold', but it is difficult to be gentle with a stiff cookie dough. Do the best you can.

Adapted from Sprinkled with Flour

Fresh, diced peaches!
Here is the cookie dough.
I didn't see how I could 'gently fold' the peaches and chips into this stiff cookie dough. I wasn't very gentle, but I did try to be careful not to break up the peaches too much.
The recipe didn't say whether to grease or line the cookie sheets. So, I put some cookies straight on the sheet to see if they would stick. They did kinda stick, so I recommend dropping the cookie dough onto a greased or parchment lined cookie sheet.
These sweet little cookies are pretty irresistible!
You can see the cake-like texture and the yummy bits of fresh peaches and white chocolate, yum!
The Results...
Fresh Peaches and Cream Cookies were cake-like in texture and had a hint of cinnamon which tasted wonderful with the fresh, diced peaches and white chocolate chips.  

I had cookies and milk waiting for my husband when he came home from work---what a lucky guy! :)  He liked these cookies and thought this was an interesting way to use peaches.  Peaches and Cream Cookies are slightly different from the usual cookies we make. We prefer a more dense, chewy cookie, but we still liked these cake-like peach cookies.  Cookies never last long around here and these cute, little, peach cookies soon disappeared!   
 

I share recipes at these linky parties.
I'm looking forward to checking out all the Peaches and Cream Desserts from this challenge! You can find them at the end of this post.
Lady Behind the Curtain Dessert Challenge
reade more... Résuméabuiyad

Lemon mini Cheesecakes with Fresh Blueberry Sauce

It's time for another Behind the Curtain Dessert Challenge from Lady Behind the Curtain.  Each month we are assigned two ingredients.  The challenge is to make a delicious dessert with those two ingredients.  This month it's Blueberries and Lemon.  One of my favorite food combinations!  I had a difficult time deciding what to make.  I finally decided to take an old family favorite recipe for mini cheesecakes and give it a blueberry-lemon twist.

Ingredients (printable recipe)
Cheesecakes:
2 (8 oz.) packages cream cheese, softened
1/2 cup granulated sugar
1/2 teaspoon vanilla
1 teaspoon fresh lemon juice
2 eggs
cupcake holders
vanilla wafers
Blueberry Sauce:
2 cups fresh blueberries
1/4 cup granulated sugar
1 Tablespoon cornstarch
1 Tablespoon fresh lemon juice
Directions
Place one vanilla wafer into each cupcake holder. Beat together softened cream cheese, sugar, vanilla and lemon juice until smooth. Add 2 whole eggs and blend well. Pour into prepared cupcake pan. Bake at 325 degrees F. for 20 minutes. Makes about 20 mini cheesecakes. Fill any empty spots in your cupcake pan with water before baking. This helps the cheesecakes bake more evenly. Let cool completely and chill in refrigerator, preferably overnight.

Make sauce before serving. Combine blueberries, sugar, corn starch, and lemon juice in a medium saucepan. Over low heat, cook mixture, mashing blueberries slightly, until sauce has reduced and slightly thickens (about 5-10 minutes). Remove from heat and let cool. Serve over mini Cheesecakes.

Recipe for mini Cheesecakes is originally from a friend in Texas. I changed it slightly.
Recipe for Blueberry Sauce is from Foodnetwork Canada (just the sauce part).

Notes: Add some lemon zest to the cheesecake batter next time to boost the lemon flavor.

cute, easy little crust
An ice cream scoop makes pouring batter into cupcake pans easier and less messy.
Baked and chilled overnight. Ready to make some Fresh Blueberry Sauce!
Before
After about 10 minutes on low heat.
They're mini so it's OK to have a few. Stack them up and serve with lots of yummy blueberry sauce.
The Results...
The fresh blueberry sauce is definitely worth making again.  It has simple ingredients, was simple to make AND it tasted so good that I licked the pan clean. :)  It would be delicious on pancakes, waffles or ice cream, too.  It was tasty on top of these cute mini cheesecakes.

The only thing I would change next time is add some lemon zest to the cheesecake batter.  The lemon flavor in these cheesecakes needed a boost.  If you like cheesecake give these mini cheesecakes a try.  They are much easier to make and quicker to bake than a whole cheesecake. Enjoy!

I share recipes at these linky parties.
This recipe is part of the Behind the Curtain Dessert Challenge.  Check out the other Blueberry and Lemon recipes at the end of this post.
   
Lady Behind the Curtain Dessert Challenge
reade more... Résuméabuiyad

Free-Form Pear Tarts with Almond and Cinnamon

Free-Form Pear Tarts with Almond and Cinnamon are very simple to make.  Don't let the long, fancy name fool you.  Store bought almond paste and puff pastry help make this a quick and easy dessert.  You don't have to tell your family and friends how easy these are to make.  Let them think you slaved over these delicious tarts! :) 

Ingredients (printable recipe)
1/4 cup granulated sugar
1/4 teaspoon ground cinnamon
1 sheet frozen puff pastry (9-3/4-inch square), thawed overnight in the refrigerator
Flour for dusting
2 Tablespoons almond paste (from can or tube)
4 teaspoons sour cream
2 small firm-ripe pears, peeled, cored and cut into 12 wedges each.
Vanilla ice cream, if desired
Directions
Line a baking sheet with parchment paper. Combine the sugar and cinnamon in a small bowl. Unroll or unfold the puff pastry on a lightly floured surface. Pinch any creases together and then smooth them out with your fingertips. Cut the pastry sheet into four equal squares and transfer them to the lined baking sheet.

Roll 1-1/2 teaspoons of almond paste in to a small ball, flatten it slightly with the palm of your hand, and put it the center of one puff pastry square. Drop 1 teaspoon of sour cream on top. Sprinkle about 1/2 tablespoon of the cinnamon sugar over the sour cream. Arrange four pear wedges in the center of the puff pastry, two leaning away from the center one way and two leaning the other way. Sprinkle with another 1/2 tablespoon of the cinnamon sugar. Repeat with the remaining three puff pastry squares and filling ingredients---you won't need all of the sliced pears.

Fold corners of the puff pastry over the pears until the tips are just touching, but not overlapping and press the dough against the pears. (The tarts won't look pretty now, but they'll be beautiful once they bake and puff up.) 

Bake until puffed and golden brown on the edges, 22-27 minutes. Let cool. Any juices that leak on to the baking sheet will harden to a candy-like consistency, so break-off these bits before serving.
Serve with a scoop of vanilla ice cream, if you like.
Makes 4 servings

Source Fine Cooking recipe by Gale Gand

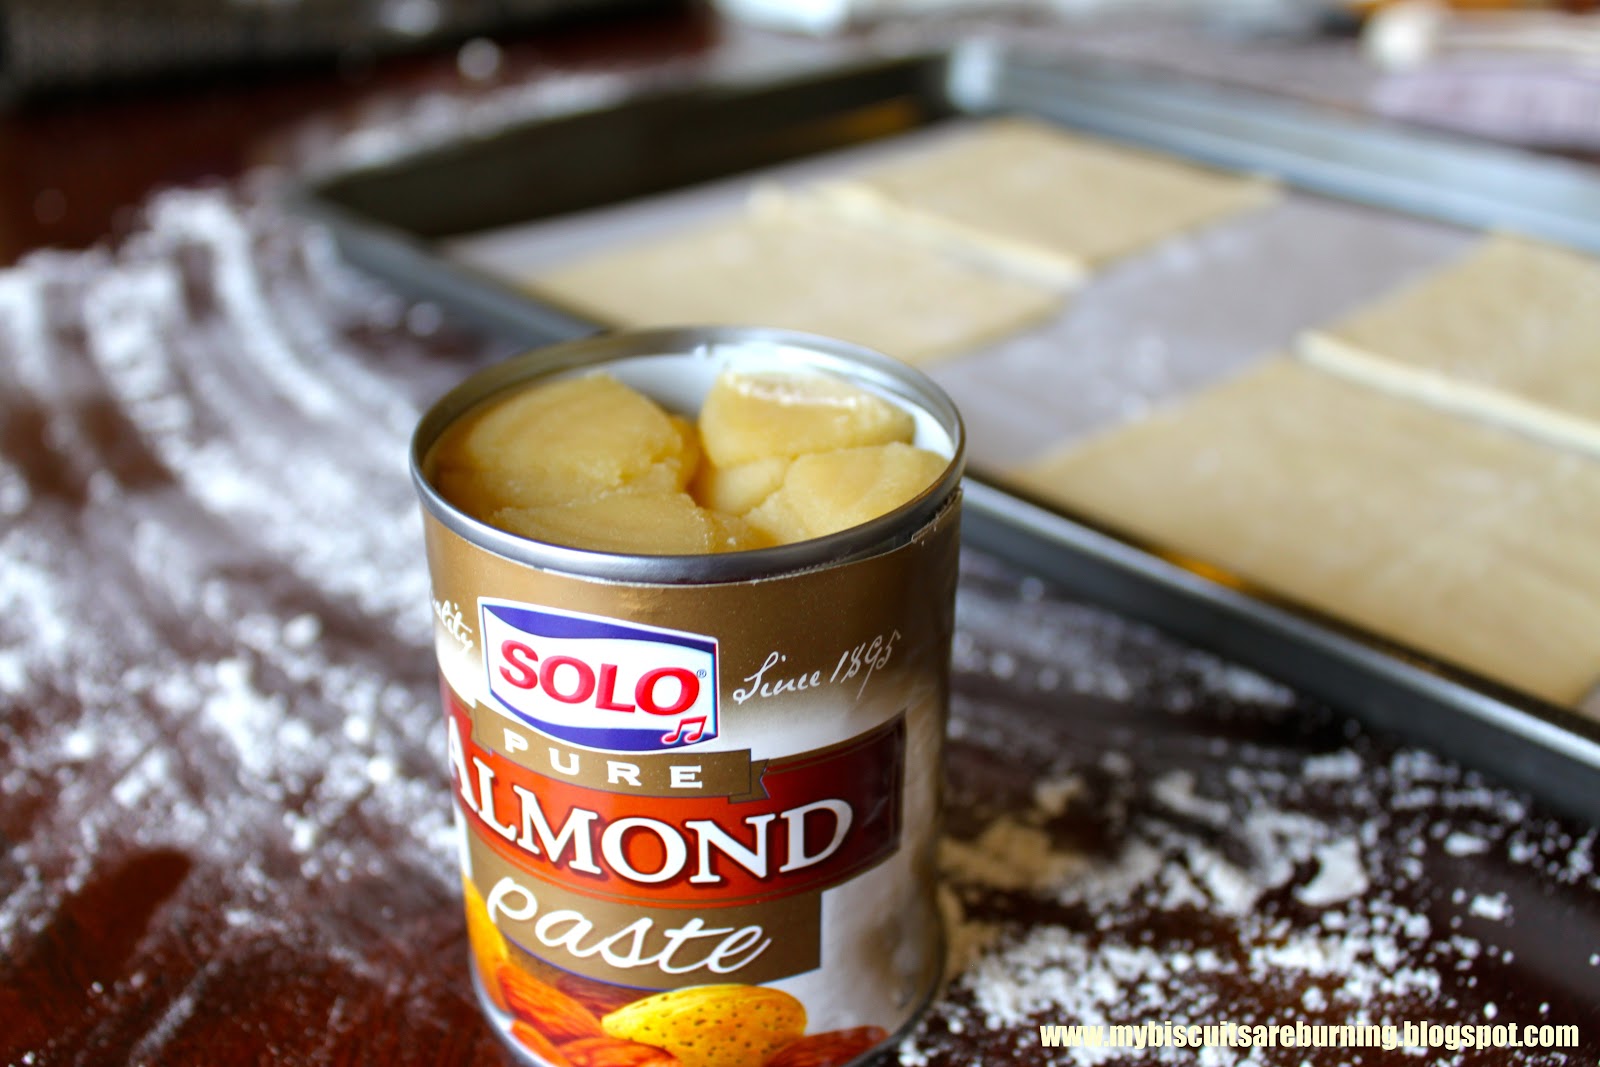
 Almond paste is found in a can like this or in a tube at your local grocery store in the baking section. Almond paste is basically ground almonds and sugar combined together with either egg whites or a liquid sugar syrup. (It's a little pricey--this 8 oz. can was about $5, but for this recipe I only used about 1/4 of the can.)
 You could also make almond paste in a food processor. Just search for an almond paste recipe and you will find a lot of different ones, some with egg whites and some with simple syrup.
Almond paste, sour cream, cinnamon sugar, pears and more cinnamon sugar. Yum!
The corners of the puff pastry are folded up just until they touch. That's it! These tarts are ready for the oven. See, I told you these are so easy to make!
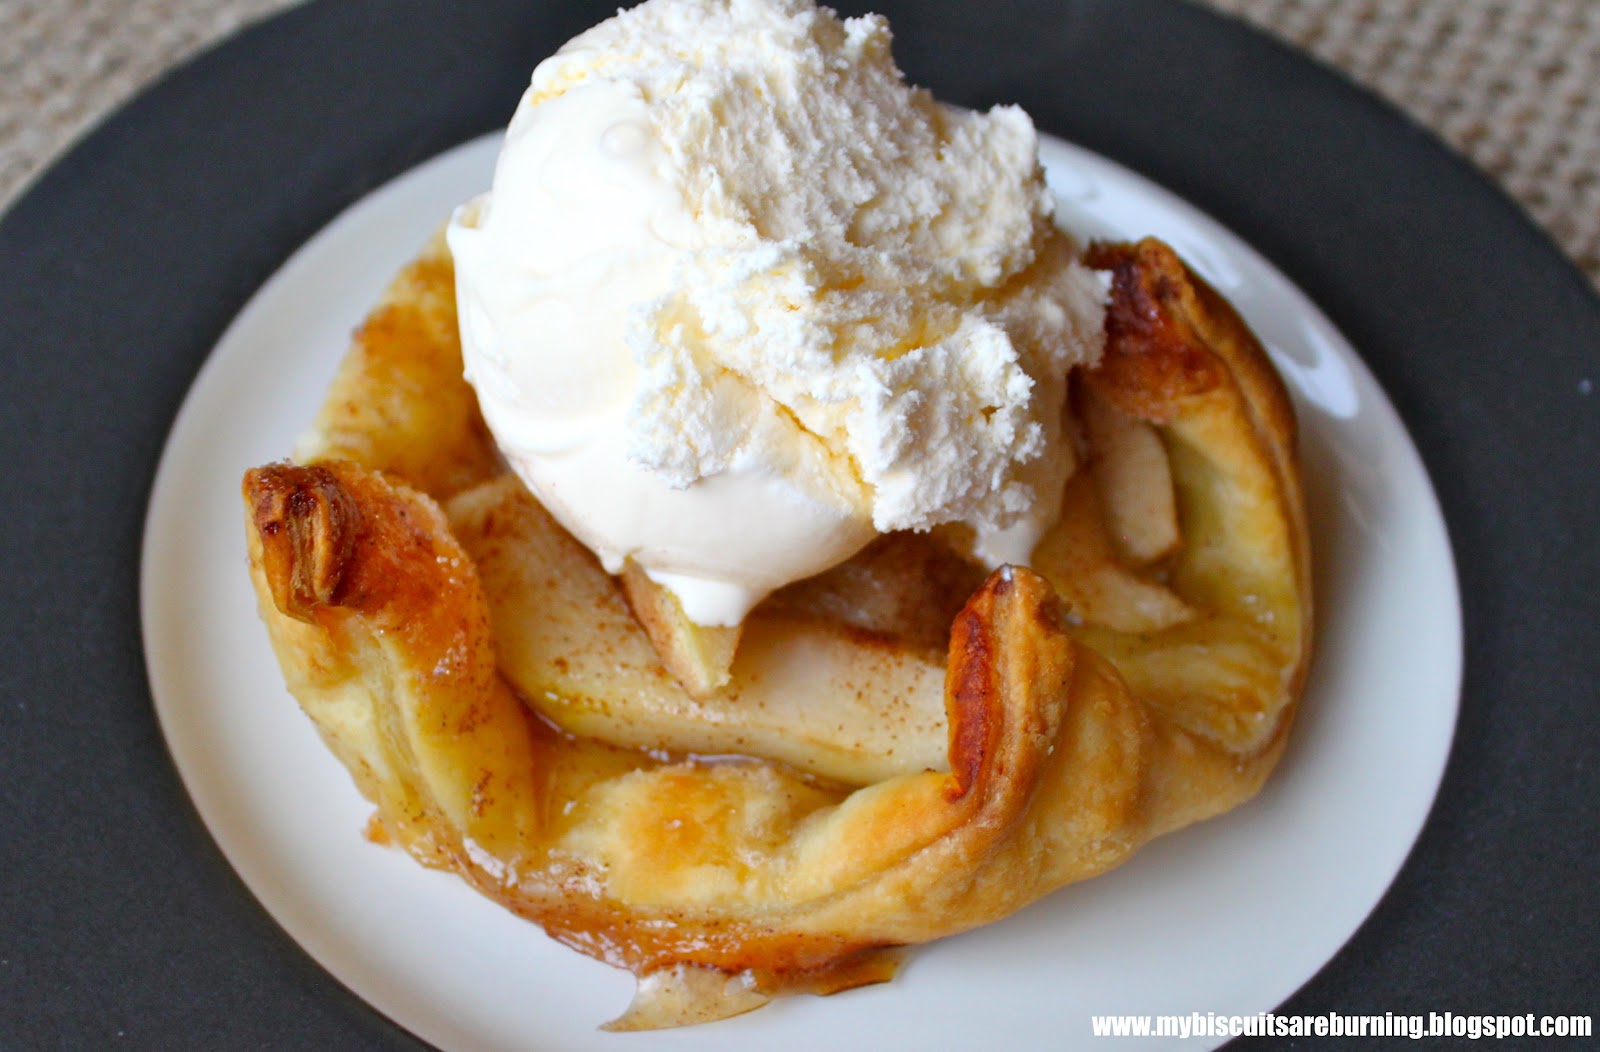
As these tarts bake, the pastry puffs up and opens, creating a bowl. A really delicious bowl!
The perfect spot for adding a scoop of vanilla ice cream.
The Results...
Easy and delicious!  This was a fun dessert to make and share with my family.  The kids can even help put these together by rolling the almond paste into balls or sprinkling on the cinnamon sugar.

Our family gave this recipe 4 stars (out of 5).  My husband suggested I flatten out the almond paste more the next time I make these tarts.  It was all in the middle and he would like it more evenly distributed because he enjoyed the almond flavor mixed with the pears.

Free-Form Pear Tarts with Almond and Cinnamon are part of The Lady Behind the Curtain's Dessert Challenge. (You can find more information about the Dessert Challenge here.)  Every month we are assigned two ingredients (this month it was Almond Paste and Pastry Dough).  We are to take those two ingredients and create or find a recipe using the chosen ingredients.  I have to admit that I was a little worried about this month's challenge because I didn't even know what almond paste was or where to find it.  But, I discovered that almond paste is at my local grocery store in the baking aisle!

The following recipes are from other blogs that are part of the Behind the Curtain Dessert Challenge, too.
Lady Behind the Curtain Dessert Challenge


I also share recipes at these linky parties.
reade more... Résuméabuiyad

Cherry Swirled Cheesecake

Valentine's Day just isn't complete without a decadent treat.  Last year I made Molten Chocolate Lava Cakes for Valentine's Day.  Those little cakes are so good, especially with a scoop of ice cream!

This year I'm making Cherry Swirled Cheesecake.  My husband loves cherries and chocolate together.  I can't see why he wouldn't love a piece of this rich cheesecake swirled with a cherry sauce and baked on top of a chocolate cookie crust.  This is a perfect Valentine's Day dessert! 

This recipe is part of the Behind the Curtain Dessert Challenge.  In this challenge there are two ingredients that must be used together in a dessert each month.  This month those two ingredients were chocolate and cherries, a great combination for Valentine's Day!

Ingredients (printable recipe)
Crust
1 1/4 cups chocolate cookie crumbs (I used Oreos without the cream)
1/4 cup granulated sugar
1/4 cup butter, melted
Cheesecake
2 (8 ounce) packages cream cheese, softened
1 (14 ounce) can sweetened condensed milk
3 large eggs
1/3 cup lemon juice
1 teaspoon vanilla extract
Cherry Sauce
1 (21 ounce) can cherry pie filling or topping
Directions
1. Preheat oven to 300 degrees F. Combine cookie crumbs, sugar and melted butter; press firmly on bottom of 9 inch springform pan.
2. In blender, puree cherry pie filling until smooth. Then, in a large bowl, beat cream cheese until fluffy. Gradually beat in sweetened condensed milk until smooth. Add eggs, lemon juice and vanilla; mix well.
3. Pour half of the batter into pan; top with 1/2 cup of cherry puree. Repeat one more layer batter and puree. With a toothpick or knife, swirl puree into cheesecake mixture.
4. Bake 50-55 minutes or until center is set.* Cool, chill completely.** Overnight in the refrigerator is best. Serve with remaining puree. Store leftovers covered in refrigerator.
Serves 12

*Every oven is different, but it took an extra 15-20 minutes in my oven for the center to set.
**Here are some great tips from ehow on how to remove your cheesecake from the springform pan.   Cool and refrigerate for 2-3 hours before removing!

Adapted from Allrecipes/Eagle Brand Recipes

Here's my sweet little helper crushing the Oreos. This was a great job for these little hands.
The chocolate cookie crust pressed firmly on the bottom of the springform pan.
Cherry Pie filling pureed in the blender.
Here's my sweet little helper again! I already had a bag of Meyer lemons. We used about 5 or 6 to get 1/3 cup of lemon juice.
First, a layer of cheesecake on top of the cookie crust.
Next, 1/2 cup of cherry puree
Another cheesecake layer and cherry puree. I used a toothpick to swirl the cherry puree into the cheesecake batter. Isn't it pretty!
 See the yummy layers of cheesecake and cherry puree!
The Results...
Beautiful.  Sweet.  Rich.   
What's not to love!  

We gave this recipe 4 1/2 stars (out of 5)---almost perfection.  There was just one little thing that I would change next time.  I would slightly reduce the amount of butter in the crust to 1/4 cup instead of 1/3 cup.  As it baked, the butter oozed out from the bottom of the pan and when I pulled it out of the oven, butter dripped onto the floor. (I made this a second time and 1/4 cup butter worked much better. I've adjusted the recipe.) 

It still tasted wonderful.  I haven't made a lot of cheesecakes, but this is the best tasting cheesecake that I've made!  Cherry Swirled Cheesecake is a love-ly way to end a sweet day.  
 Happy Valentine's Day! 

Take a look at all the delicious chocolate and cherry dessert recipes from the Behind the Curtain Dessert Challenge!

Lady Behind the Curtain Dessert Challenge


This recipe is featured at:
The Weekend Potluck 
Foodie Friends Friday Host favorites 
I also share recipes at these linky parties.
reade more... Résuméabuiyad